Category: ReactJS

  • Context Splitting in React: A Technique to Prevent Unnecessary Rerenders

    Context Splitting in React: A Technique to Prevent Unnecessary Rerenders

    One of the most common issues developers face is managing rerenders, especially when working with Context API. Today, I want to share a powerful technique that quite known but… 😄

    The Problem with Traditional Context

    Before diving into the solution, let’s understand the problem. When using React’s Context API in the traditional way, any component that consumes a context will rerender whenever any value within that context changes.

    Consider this example:

    // Traditional Context approach
    const ThemeContext = React.createContext({
      theme: "light",
      setTheme: () => {},
    });
    
    function ThemeProvider({ children }) {
      const [theme, setTheme] = useState("light");
    
      return (
        <ThemeContext.Provider value={{ theme, setTheme }}>
          {children}
        </ThemeContext.Provider>
      );
    }
    
    function ThemeDisplay() {
      const { theme } = useContext(ThemeContext);
      console.log("ThemeDisplay rendering");
      return <div>Current theme: {theme}</div>;
    }
    
    function ThemeToggle() {
      const { setTheme } = useContext(ThemeContext);
      console.log("ThemeToggle rendering");
    
      return (
        <button
          onClick={() => setTheme((prev) => (prev === "light" ? "dark" : "light"))}
        >
          Toggle Theme
        </button>
      );
    }

    The issue here is that both ThemeDisplay and ThemeToggle will rerender whenever the theme changes, even though ThemeToggle only needs setTheme and doesn’t actually use the current theme value in its rendering.

    The Possible Solution: Context Splitting 💡

    The context splitting pattern addresses this problem by separating our context into two distinct contexts:

    1. data context that holds just the state (e.g., theme)
    2. setter context that holds just the updater function (e.g., setTheme)

    Here’s how it looks in practice:

    // Split Context approach
    const ThemeContext = React.createContext("light");
    const ThemeSetterContext = React.createContext(() => {});
    
    function ThemeProvider({ children }) {
      const [theme, setTheme] = useState("light");
    
      return (
        <ThemeContext.Provider value={theme}>
          <ThemeSetterContext.Provider value={setTheme}>
            {children}
          </ThemeSetterContext.Provider>
        </ThemeContext.Provider>
      );
    }
    
    function ThemeDisplay() {
      const theme = useContext(ThemeContext);
      console.log("ThemeDisplay rendering");
      return <div>Current theme: {theme}</div>;
    }
    
    function ThemeToggle() {
      const setTheme = useContext(ThemeSetterContext);
      console.log("ThemeToggle rendering");
    
      return (
        <button
          onClick={() => setTheme((prev) => (prev === "light" ? "dark" : "light"))}
        >
          Toggle Theme
        </button>
      );
    }

    With this pattern, when the theme changes:

    • ThemeDisplay rerenders (as it should since it displays the theme)
    • ThemeToggle does NOT rerender because it only consumes the setter context, which never changes (the setter function reference remains stable)

    Complete Example with Rerender Counting 🧪

    Let’s create a more complete example that demonstrates the difference between the traditional and split context approaches. We’ll add rerender counters to visualize the performance impact:

    import React, { useState, useContext, memo } from "react";
    import ReactDOM from "react-dom/client";
    
    /* ========== Traditional Context (Single) ========== */
    const TraditionalThemeContext = React.createContext({
      theme: "light",
      setTheme: () => {},
    });
    
    const TraditionalThemeProvider = ({ children }) => {
      const [theme, setTheme] = useState("light");
      return (
        <TraditionalThemeContext.Provider value={{ theme, setTheme }}>
          {children}
        </TraditionalThemeContext.Provider>
      );
    };
    
    const TraditionalThemeDisplay = memo(() => {
      const { theme } = useContext(TraditionalThemeContext);
      console.log("🔁 TraditionalThemeDisplay re-rendered");
      return (
        <div>
          Current theme: <strong>{theme}</strong>
        </div>
      );
    });
    
    const TraditionalThemeToggleButton = memo(() => {
      const { setTheme } = useContext(TraditionalThemeContext);
      console.log("🔁 TraditionalThemeToggleButton re-rendered");
      return (
        <button
          onClick={() => setTheme((prev) => (prev === "light" ? "dark" : "light"))}
        >
          Toggle Theme
        </button>
      );
    });
    
    /* ========== Optimized Context (Split) ========== */
    const ThemeContext = React.createContext("light");
    const SetThemeContext = React.createContext(() => {});
    
    const ThemeProvider = ({ children }) => {
      const [theme, setTheme] = useState("light");
    
      return (
        <ThemeContext.Provider value={theme}>
          <SetThemeContext.Provider value={setTheme}>
            {children}
          </SetThemeContext.Provider>
        </ThemeContext.Provider>
      );
    };
    
    const OptimizedThemeDisplay = memo(() => {
      const theme = useContext(ThemeContext);
      console.log("✅ OptimizedThemeDisplay re-rendered");
      return (
        <div>
          Current theme: <strong>{theme}</strong>
        </div>
      );
    });
    
    const OptimizedThemeToggleButton = memo(() => {
      const setTheme = useContext(SetThemeContext);
      console.log("✅ OptimizedThemeToggleButton re-rendered");
      return (
        <button
          onClick={() => setTheme((prev) => (prev === "light" ? "dark" : "light"))}
        >
          Toggle Theme
        </button>
      );
    });
    
    /* ========== App ========== */
    export const App = () => {
      return (
        <div style={{ fontFamily: "sans-serif", padding: 20 }}>
          <h1>🎨 Theme Context Comparison</h1>
    
          <div style={{ marginBottom: 40, padding: 10, border: "1px solid gray" }}>
            <h2>🧪 Traditional Context (Single)</h2>
            <TraditionalThemeProvider>
              <TraditionalThemeDisplay />
              <TraditionalThemeToggleButton />
            </TraditionalThemeProvider>
          </div>
    
          <div style={{ marginBottom: 40, padding: 10, border: "1px solid gray" }}>
            <h2>⚡ Optimized Context (Split)</h2>
            <ThemeProvider>
              <OptimizedThemeDisplay />
              <OptimizedThemeToggleButton />
            </ThemeProvider>
          </div>
        </div>
      );
    };

    Initial render:

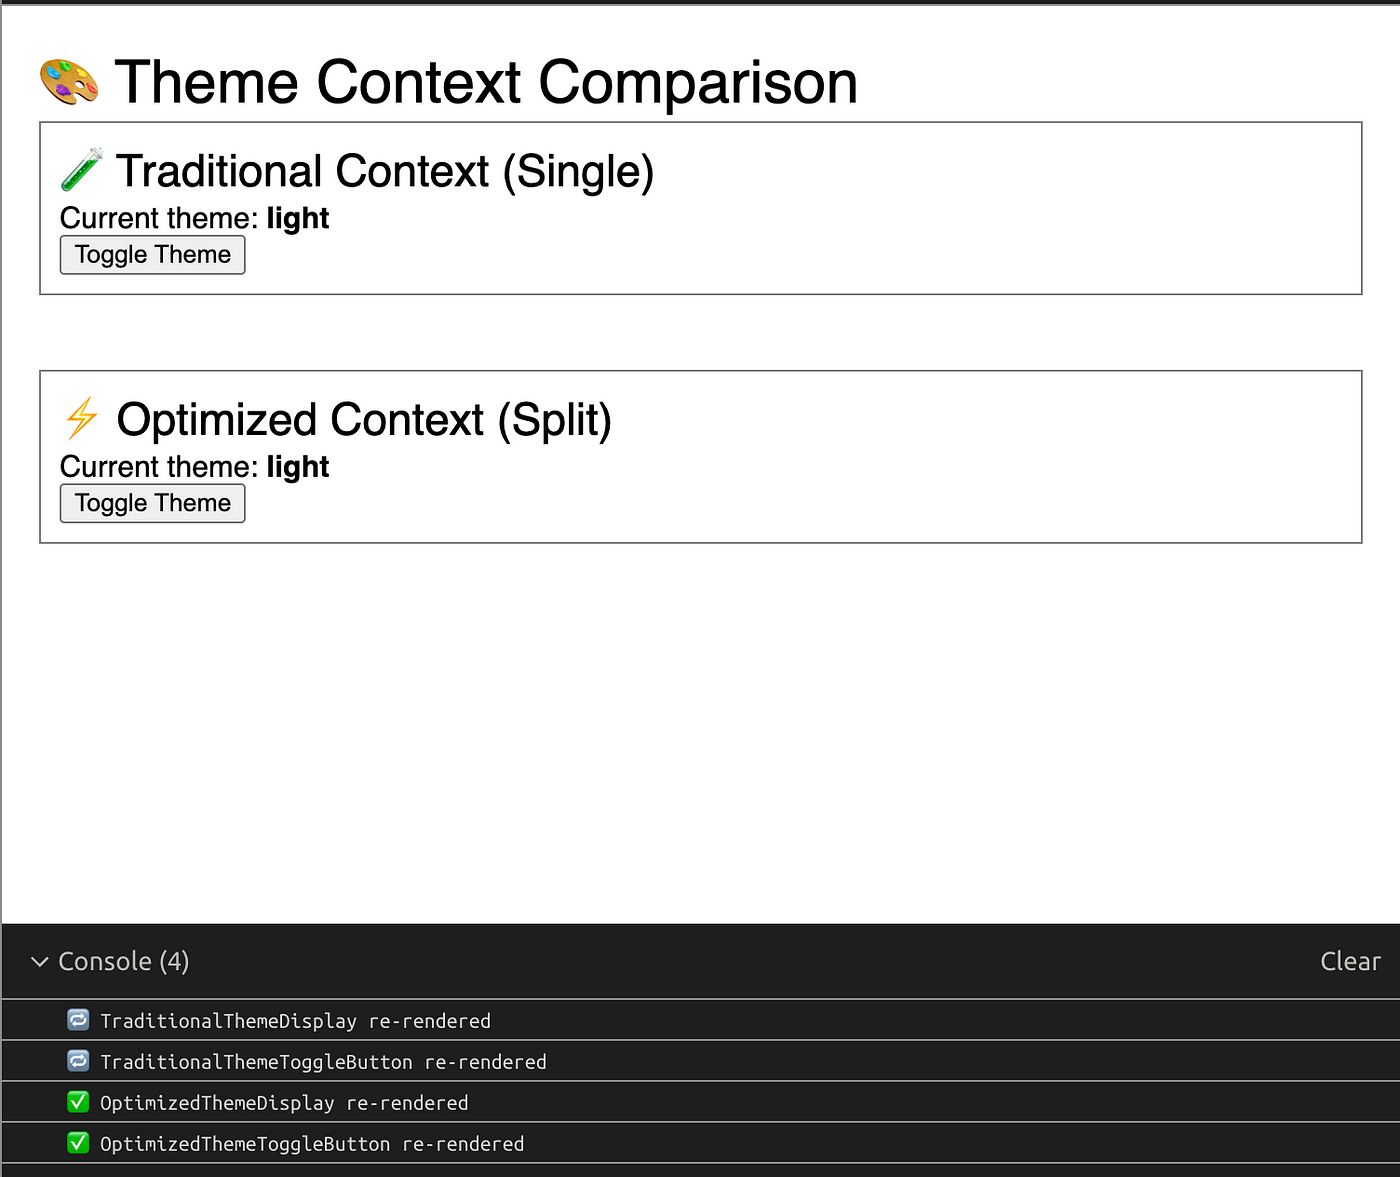
    Now lets see what happens when we click toggle buttons

    What to Look for in Console

    Each toggle will log:

    Traditional Context:

    🔁 TraditionalThemeDisplay re-rendered

    🔁 TraditionalThemeToggleButton re-rendered ✅ ← re-renders unnecessarily

    Optimized Context:

    ✅ OptimizedThemeDisplay re-rendered

    ✅ OptimizedThemeToggleButton re-rendered ❌ ← does NOT re-render

    Optimizing with useMemo

    We can optimize the traditional approach somewhat by using useMemo to prevent the context value object from being recreated on every render:

    function OptimizedTraditionalProvider({ children }) {
      const [theme, setTheme] = useState("light");
    
      // Memoize the value object to prevent unnecessary context changes
      const value = useMemo(
        () => ({
          theme,
          setTheme,
        }),
        [theme]
      );
    
      return (
        <TraditionalThemeContext.Provider value={value}>
          {children}
        </TraditionalThemeContext.Provider>
      );
    }

    This helps, but still has the fundamental issue that components consuming only setTheme will rerender when theme changes. The split context approach solves this problem more elegantly.

    When to Use Context Splitting

    Context splitting is particularly valuable when:

    1. You have many components that only need to update state but don’t need to read it
    2. You have expensive components that should only rerender when absolutely necessary
    3. Your app has deep component trees where performance optimization matters

    Potential Downsides

    While context splitting is powerful, it does come with some trade-offs:

    1. Increased Complexity — Managing two contexts instead of one adds some boilerplate
    2. Provider Nesting — You end up with more nested providers in your component tree
    3. Mental Overhead — Developers need to choose the right context for each use case

    Custom Hooks for Clean API

    To make this pattern more developer-friendly, you can create custom hooks:

    function useTheme() {
      return useContext(ThemeContext);
    }
    
    function useSetTheme() {
      return useContext(ThemeSetterContext);
    }
    
    // Usage
    function MyComponent() {
      const theme = useTheme();
      const setTheme = useSetTheme();
      // ...
    }

    Measuring the Performance Impact

    When you run the demo code provided above, you’ll see a clear difference in render counts:

    1. With the traditional context, both the reader and toggler components rerender when the theme changes
    2. With the split context, only the reader rerenders while the toggler’s render count stays the same

    This performance difference might seem small in a simple example, but in a real application with dozens or hundreds of components consuming context, the impact can be substantial.

    Conclusion 🚀

    Context splitting is a powerful technique for optimizing React applications that use the Context API. By separating your state and setter functions into different contexts, you can ensure components only rerender when the specific data they consume changes.

    While this technique adds some complexity to your codebase, the performance benefits can be visible in larger applications.

  • How to Cache in React and Next.js Apps with Best Practices for 2025

    How to Cache in React and Next.js Apps with Best Practices for 2025

    In modern web development, speed and efficiency are important. Whether you’re building with React or using Next.js, caching has become one of the most important techniques for improving performance, reducing server load, and making user experience better.

    With the latest updates in Next.js and advancements in the React ecosystem, caching strategies have improved, and learning them is key for any serious developer. In this blog, we’ll learn how caching works in both React and Next.js, go through best practices, and highlight real-world examples that you can apply today.

    What is Caching?

    Caching refers to the process of storing data temporarily so future requests can be served faster. In the context of web applications, caching can occur at various levels:

    • Browser caching (storing static assets)
    • Client-side data caching (with libraries like SWR or React Query)
    • Server-side caching (Next.js API routes or server actions)
    • CDN caching (via edge networks)

    Effective caching minimizes redundant data fetching, accelerates loading times, and improves the perceived performance of your application.

    Caching in React Applications

    React doesn’t have built-in caching, but the community provides powerful tools to manage cache effectively on the client side.

    1. React Query and SWR for Data Caching

    These libraries help cache remote data on the client side and reduce unnecessary requests:

    import useSWR from "swr";
    
    const fetcher = (url: string) => fetch(url).then((res) => res.json());
    
    export default function User() {
      const { data, error } = useSWR("/api/user", fetcher);
    
      if (error) return <div>Failed to load</div>;
      if (!data) return <div>Loading...</div>;
      return <div>Hello {data.name}</div>;
    }

    Best Practices:

    • Set revalidation intervals (revalidateOnFocusdedupingInterval)
    • Use optimistic updates for a snappy UI
    • Preload data when possible

    2. Memoization for Component-Level Caching

    For expensive computations and rendering logic:

    import { useMemo } from "react";
    
    const ExpensiveComponent = ({ items }) => {
      const sortedItems = useMemo(() => items.sort(), [items]);
      return <List items={sortedItems} />;
    };

    3. LocalStorage and SessionStorage

    Persisting client state across sessions:

    useEffect(() => {
      const cachedData = localStorage.getItem("userData");
      if (cachedData) {
        setUser(JSON.parse(cachedData));
      }
    }, []);

    Server-Side Caching in Next.js (Latest App Router)

    With the App Router in Next.js 13+ and the stability in v14+, server actions and data caching have become much more robust and declarative.

    1. Caching with fetch and cache Option

    Next.js allows caching behavior to be specified per request:

    export async function getProduct(productId: string) {
      const res = await fetch(`https://api.example.com/products/${productId}`, {
        next: { revalidate: 60 }, // ISR (Incremental Static Regeneration)
      });
      return res.json();
    }

    Best Practices:

    • Use cache: 'force-cache' for static content
    • Use revalidate to regenerate content periodically
    • Use cache: 'no-store' for dynamic or user-specific data

    2. Using Server Actions and React Server Components (RSC)

    // app/actions.ts
    "use server";
    
    export async function saveData(formData: FormData) {
      const name = formData.get("name");
      // Save to database or perform API calls
    }

    Server actions in the App Router allow you to cache server-side logic and fetch results in React Server Components without hydration.

    3. Using generateStaticParams and generateMetadata

    These methods help Next.js know which routes to pre-build and cache efficiently:

    export async function generateStaticParams() {
      const products = await fetchProducts();
      return products.map((product) => ({ id: product.id }));
    }

    Cache Invalidation Strategies

    Proper cache invalidation ensures that stale data is replaced with up-to-date content:

    • Time-based (revalidate: 60 seconds)
    • On-demand revalidation (res.revalidate in API route)
    • Tag-based revalidation (coming soon in Next.js)
    • Mutations trigger refetch in SWR/React Query

    CDN and Edge Caching with Next.js

    Vercel and other hosting providers like Netlify and Cloudflare deploy Next.js apps globally. Edge caching improves load time by serving users from the nearest region.

    Tips:

    • Leverage Edge Functions for dynamic personalization
    • Use headers like Cache-Control effectively
    • Deploy static assets via CDN for better global performance

    Final Best Practices

    • Prefer static rendering where possible
    • Cache API calls both on server and client
    • Use persistent cache (IndexedDB/localStorage) when applicable
    • Memoize expensive computations
    • Profile and audit cache hits/misses with dev tools

    Conclusion

    Caching in React and Next.js is no longer optional — it’s essential for delivering fast, resilient, and scalable applications. Whether you’re fetching data client-side or leveraging powerful server-side features in Next.js App Router, the right caching strategy can drastically improve your app’s performance and user satisfaction. As frameworks evolve, staying updated with caching best practices ensures your apps remain performant and competitive.

    By applying these techniques, you not only enhance the speed and reliability of your applications but also reduce infrastructure costs and improve SEO outcomes. Start caching smartly today and take your web performance to the next level.

  • Why Do We Need useLayoutEffect?

    Why Do We Need useLayoutEffect?

    If you have worked at all with React hooks before then you have used the useEffect hook extensively. You may not know, though, that there is a second type of useEffect hook called useLayoutEffect. In this article I will be explaining the useLayoutEffect hook and comparing it to useEffectIf you are not already familiar with useEffect check out my full article on it here.

    The Biggest Difference

    Everything about these two hooks is nearly identical. The syntax for them is exactly the same and they are both used to run side effects when things change in a component. The only real difference is when the code inside the hook is actually run.

    In useEffect the code in the hook is run asynchronously after React renders the component. This means the code for this hook can run after the DOM is painted to the screen.

    The useLayoutEffect hook runs synchronously directly after React calculates the DOM changes but before it paints those changes to the screen. This means that useLayoutEffect code will delay the painting of a component since it runs synchronously before painting, while useEffect is asynchronous and will not delay the paint.

    Why Use useLayoutEffect?

    So if useLayoutEffect will delay the painting of a component why would we want to use it. The biggest reason for using useLayoutEffect is when the code being run directly modifies the DOM in a way that is observable to the user.

    For example, if I needed to change the background color of a DOM element as a side effect it would be best to use useLayoutEffect since we are directly modifying the DOM and the changes are observable to the user. If we were to use useEffect we could run into an issue where the DOM is painted before the useEffect code is run. This would cause the DOM element to be the wrong color at first and then change to the right color due to the useEffect code.

    You Probably Don’t Need useLayoutEffect

    As you can see from the previous example, use cases for useLayoutEffect are pretty niche. In general it is best to always use useEffect and only switch to useLayoutEffect when you actually run into an issue with useEffect causing flickers in your DOM or incorrect results.

    Conclusion

    useLayoutEffect is a very useful hook for specific situations, but in most cases you will be perfectly fine using useEffect. Also, since useEffect does not block painting it is the better option to use if it works properly.

  • useTransition Hook Explained

    useTransition Hook Explained

    React 18 recently had its official non-beta release and with it came multiple new React hooks. Of those hooks, the one I am most excited for is the useTransition hook. This hook helps increase the performance of your applications, increase the responsiveness of your application to users, and overall just make your application better. This article is all about how this new hook works and is also full of multiple interactive examples so you can truly see and feel the difference in using this hook.

    Why Do You Need useTransition?

    Before we can talk about what this hook does and how to use it we first need to understand a few concepts about how state works in React in order to understand the use case for this hook.

    Imagine you have the following code.

    function App() {
      const [name, setName] = useState("");
      const [count, setCount] = useState(0);
    
      function handleChange(e) {
        setName(e.target.value);
        setCount((prevCount) => prevCount + 1);
      }
    
      return <input type="text" value={name} onChange={handleChange} />;
    }
    

    This is a very simple component with two state variables that both get updated at the same time when we change the value in our input field. If you are unfamiliar with the useState hook then you should check out my complete useState hook article before reading further.

    React is smart enough to see that these state updates happen at the same time so it will group them together and perform both state updates before rendering the component again. This is really nice since it only renders the component once after all the state changes instead of twice (once after each state change).

    This works really well in most cases but it can lead to performance problems.

    function App() {
      const [name, setName] = useState("");
      const [list, setList] = useState(largeList);
    
      function handleChange(e) {
        setName(e.target.value);
        setList(largeList.filter((item) => item.name.includes(e.target.value)));
      }
    
      return (
        <>
          <input type="text" value={name} onChange={handleChange} />
          {list.map((item) => (
            <ListComponent key={item.id} item={item} />
          ))}
        </>
      );
    }
    

    In this example we are now setting a list variable based on the value we type in our input. Normally this is not something you would want to do since storing derived state in React is bad. If you want to learn why, I explain this in depth in my article on derived state.

    Our list is incredibly long so looping through the entire list, filtering each item, and rendering them all to the screen is quite time consuming and especially on older devices will be very slow to process. This is a problem since this list state update happens at the same time as the name state update so the component won’t rerender with the new state values for either piece of state until both finish processing which means the input field will feel very slow. Below is an example of what this would look like.

    Instead of rendering out thousands of items to the screen, I am instead emulating the slowness artificially and only rendering a few items to the screen so as to not overwhelm your computer. Also, the items being rendered are just exact copies of whatever you type in to the input field and you can only enter one character at a time into the input field or it will not work as expected.

    Item: a

    Item: a

    Item: a

    Item: a

    Item: a

    As you can see in this example when you try to type into the input box it is really slow and takes about a second to update the input box. This is because rendering and processing the list takes so long. This is where useTransition comes in.

    useTransition Explained

    The useTransition hook allows us to specify some state updates as not as important. These state updates will be executed in parallel with other state updates, but the rendering of the component will not wait for these less important state updates.

    function App() {
      const [name, setName] = useState("");
      const [list, setList] = useState(largeList);
      const [isPending, startTransition] = useTransition();
    
      function handleChange(e) {
        setName(e.target.value);
        startTransition(() => {
          setList(largeList.filter((item) => item.name.includes(e.target.value)));
        });
      }
    
      return (
        <>
          <input type="text" value={name} onChange={handleChange} />
          {isPending ? (
            <div>Loading...</div>
          ) : (
            list.map((item) => <ListComponent key={item.id} item={item} />)
          )}
        </>
      );
    }
    

    Calling the useTransition hook returns an array with the first value being an isPending variable and the second value being the startTransition function. The isPending variable simply returns true while the code inside the startTransition hook is running. Essentially, this variable is true when the slow state update is running and false when it is finished running. The startTransition function takes a single callback and this callback just contains all the code related to the slow state update including the setting of the state.

    In our case we are wrapping setList in our startTransition function which tells React that our setList state update is of low importance. This means that as soon as all of our normal state updates are finished that the component should rerender even if this slow state update is not finished. Also, if a user interacts with your application, such as clicking a button or typing in an input, those interactions will take higher priority than the code in the startTransition function. This ensures that even if you have really slow code running it won’t block your user from interacting with the application.

    Here is an example of what our list acts like with the useTransition hook.

    Item: a

    Item: a

    Item: a

    Item: a

    Item: a

    You can see that our input updates immediately when you type, but the actual list itself does not update until later. While the list is updating the text Loading... renders and then once the list finishes loading is renders the list.

    Using this hook is quite easy, but this is not something you want to use all the time. You should only use this hook if you are having performance issues with your code and there are no other ways to fix those performance concerns. If you use this hook all the time you will actually make your app less performant since React will not be able to effectively group your state updates and it will also add extra overhead to your application.

    Conclusion

    The useTransition hook makes working with slow, computationally intense state updates so much easier since now we can tell React to prioritize those updates at a lower level to more important updates which makes your application seem much more performant to users.