Category: Javascript

  • Advanced JavaScript Techniques

    Advanced JavaScript Techniques

    JavaScript has evolved significantly over the years, becoming one of the most powerful and versatile programming languages in web development. However, writing efficient, scalable, and maintainable JavaScript code requires mastering advanced techniques. By leveraging modern JavaScript patterns and features, developers can improve execution speed, enhance code modularity, and simplify complex tasks.

    This article explores ten essential advanced JavaScript techniques that will elevate your coding skills and help you build robust applications. From closures and destructuring to metaprogramming and memory management, these techniques will give you the edge needed to write professional-level JavaScript.

    1. Asynchronous JavaScript with Async/Await

    Handling asynchronous tasks effectively is crucial for modern web development. The async/await syntax provides a clean and readable way to manage asynchronous operations, replacing traditional callback-based approaches.

    Example:

    async function fetchUserData(userId) {
      const response = await new Promise((resolve) =>
        setTimeout(() => resolve({ id: userId, name: "John Doe" }), 1000)
      );
      return response;
    }
    
    async function displayUserData() {
      try {
        console.log("Fetching user data...");
        const user = await fetchUserData(123);
        console.log("User data:", user);
      } catch (error) {
        console.error("Error fetching user data:", error);
      }
    }
    
    displayUserData();

    Why Use Async/Await?

    • Improves readability by resembling synchronous code.
    • Simplifies error handling with try/catch.
    • Reduces deeply nested callback structures.

    2. Proxies for Intercepting and Enhancing Object Behavior

    JavaScript’s Proxy object allows developers to intercept and modify fundamental operations on objects, making them highly useful for creating custom behaviors such as logging, validation, and dynamic property handling.

    Example:

    const target = { name: "John" };
    const handler = {
      get: (obj, prop) => `${prop} is ${obj[prop]}`,
      set: (obj, prop, value) => {
        console.log(`Setting ${prop} to ${value}`);
        obj[prop] = value;
        return true;
      },
    };
    const proxy = new Proxy(target, handler);
    
    console.log(proxy.name); // "name is John"
    proxy.age = 30; // "Setting age to 30"

    Why Use Proxies?

    • Validation: Ensure properties meet certain criteria before being set.
    • Logging: Track access and modifications to object properties.
    • Default Values: Provide fallback values for undefined properties.
    • Computed Properties: Generate property values on-the-fly.

    By using Proxies, you can add powerful meta-programming capabilities to your JavaScript code, enabling more flexible and dynamic object interactions.

    3. Debouncing and Throttling for Performance Optimization

    Handling frequent user events like scrolling, resizing, or keypresses can impact performance. Debouncing and throttling help control function execution frequency.

    Debouncing: Debouncing delays the execution of a function until a specified time has passed since the last event trigger. This is useful for optimizing performance in cases like search input fields and window resize events.

    function debounce(func, delay) {
      let timeout;
      return function (...args) {
        clearTimeout(timeout);
        timeout = setTimeout(() => func.apply(this, args), delay);
      };
    }

    Throttling: Throttling ensures that a function is executed at most once within a given time frame, preventing excessive function calls.

    function throttle(func, limit) {
      let inThrottle;
      return function (...args) {
        if (!inThrottle) {
          func.apply(this, args);
          inThrottle = true;
          setTimeout(() => (inThrottle = false), limit);
        }
      };
    }

    These techniques improve performance by limiting how often a function runs, which is essential for user input handling and optimizing animations.

    4. Using Proxies to Intercept Object Behavior

    Proxy objects allow you to intercept and redefine fundamental operations on objects, such as property access, assignment, and function calls. This is useful for validation, logging, or building reactive frameworks.

    Example:

    const target = {
      message1: "hello",
      message2: "everyone",
    };
    
    const handler = {
      get(target, prop, receiver) {
        if (prop === "message2") {
          return "world";
        }
        return Reflect.get(...arguments);
      },
    };
    
    const proxy = new Proxy(target, handler);
    
    console.log(proxy.message1); // hello
    console.log(proxy.message2); // world

    Why Use Proxies?

    • Provides dynamic control over property access and modification.
    • Enables data validation, logging, and computed properties.
    • Useful for creating reactive programming frameworks and API wrappers.

    Proxies allow developers to intercept and modify object behavior, making them essential for metaprogramming and advanced JavaScript development.

    5. Optional Chaining (?.) for Safe Property Access

    Optional chaining (?.) provides a way to access deeply nested object properties without worrying about runtime errors due to undefined or null values.

    Example:

    const user = { profile: { name: "Alice" } };
    console.log(user.profile?.name); // 'Alice'
    console.log(user.address?.city); // undefined (no error)

    Why Use It?

    • Prevents runtime errors from missing properties.
    • Reduces excessive if statements for property checks.
    • Especially useful when working with API responses.

    6. Offload Heavy Tasks with Web Workers

    JavaScript is single-threaded, but Web Workers let you run scripts in background threads. Use them for CPU-heavy tasks like data processing or image manipulation:

    // main.js
    const worker = new Worker("worker.js");
    worker.postMessage(data);
    worker.onmessage = (e) => updateUI(e.data);
    
    // worker.js
    self.onmessage = (e) => {
      const result = processData(e.data);
      self.postMessage(result);
    };

    Why Use Web Workers?

    • Prevents UI freezes by offloading CPU-intensive tasks to background threads.
    • Enhances application responsiveness and performance.
    • Ideal for data processing, image manipulation, and real-time computations.

    Using Web Workers ensures that heavy computations do not block the main thread, leading to a smoother user experience.

    7. Master Memory Management

    Memory leaks silently degrade performance. Avoid globals, use WeakMap/WeakSet for caches, and monitor leaks with DevTools:

    const cache = new WeakMap();  
    function computeExpensiveValue(obj) {
      if (!cache.has(obj)) {
        const result = /* heavy computation */;
        cache.set(obj, result);
      }
      return cache.get(obj);
    }

    Why Use It?

    • Prevents memory leaks by allowing garbage collection of unused objects.
    • Efficient for caching without affecting memory consumption.
    • Useful for managing private data within objects.

    Using WeakMap ensures that cached objects are automatically cleaned up when no longer needed, preventing unnecessary memory usage.

    8. Currying Functions for Better Reusability

    Currying transforms a function that takes multiple arguments into a series of functions, each taking one argument. This technique makes functions more reusable and allows for partial application.

    // Basic curry function
    function curry(fn) {
      return function curried(...args) {
        if (args.length >= fn.length) {
          return fn.apply(this, args);
        } else {
          return function (...nextArgs) {
            return curried.apply(this, args.concat(nextArgs));
          };
        }
      };
    }
    
    // Usage
    const add = (a, b, c) => a + b + c;
    const curriedAdd = curry(add);
    console.log(curriedAdd(1)(2)(3));

    Why Use It?

    • Enables partial application of functions for better reusability.
    • Enhances functional programming by making functions more flexible.
    • Improves readability and simplifies repetitive tasks.

    Currying is particularly useful for creating highly reusable utility functions in modern JavaScript applications.

    9. Closures for Private State Management

    Closures are one of JavaScript’s most powerful features. They allow functions to remember and access variables from their outer scope even after the outer function has finished executing. This makes them particularly useful for encapsulating private state and preventing unintended modifications.

    Example:

    function createCounter() {
      let count = 0;
      return function () {
        count++;
        return count;
      };
    }
    
    const counter = createCounter();
    console.log(counter()); // 1
    console.log(counter()); // 2
    console.log(counter()); // 3

    Why Use Closures?

    • Encapsulation: Keep variables private and inaccessible from the global scope.
    • Data Integrity: Maintain controlled access to data, preventing unintended modifications.
    • Memory Efficiency: Create function factories that share behavior but maintain separate state.
    • Callback Functions: Preserve context in asynchronous operations.

    Closures are commonly used in event handlers, factory functions, and callback functions to preserve state efficiently.

    10. Destructuring for More Concise and Readable Code

    Destructuring simplifies the process of extracting values from arrays and objects, making your code cleaner and more readable. This technique is particularly useful when working with complex data structures or API responses.

    Object Destructuring:

    const person = { name: "Jack", age: 20 };
    const { name, age } = person;
    
    console.log(name); // 'Jack'
    console.log(age); // 20

    Array Destructuring:

    const numbers = [1, 2, 3];
    const [first, second] = numbers;
    console.log(first); // 1
    console.log(second); // 2

    Why Use Destructuring?

    • Reduces redundant variable assignments.
    • Enhances code readability.
    • Especially useful when working with API responses or function parameters.

    By leveraging destructuring, you can write more concise and expressive code, making it easier to work with complex data structures and improving overall code readability.

    Conclusion

    By mastering these advanced JavaScript techniques, developers can write cleaner, more efficient, and scalable code. Understanding closures, destructuring, proxies, async/await, and performance optimizations like debouncing and throttling will enhance your ability to build high-performance applications. Additionally, incorporating best practices like the module pattern and optional chaining will further improve your coding efficiency.

  • 10 JavaScript Tricks every developer should know

    10 JavaScript Tricks every developer should know

    JavaScript is a powerful language, but mastering it requires more than just knowing the basics. The real magic lies in the hidden gems — lesser-known but powerful tricks that can make your code cleaner, more efficient, and easier to maintain. Whether you’re a beginner or a seasoned developer, these 10 JavaScript tricks will help you level up your coding game! 👾

    1. Object.freeze() — Making Objects Immutable

    In JavaScript, by default objects are mutable, meaning you can change their properties after creation. But what if you need to prevent modifications? That’s where Object.freeze() comes in handy.

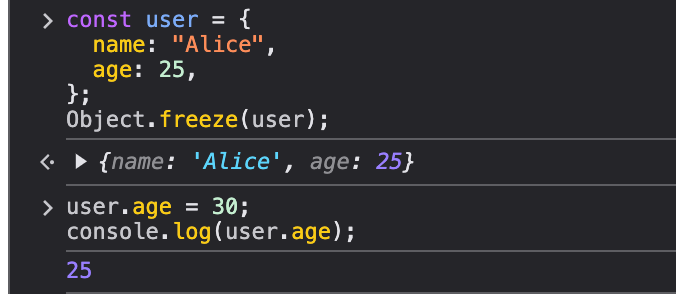
    const user = {
      name: "Alice",
      age: 25,
    };
    
    Object.freeze(user);
    
    user.age = 30; // This won't work, as the object is frozen
    console.log(user.age); // 25

    Note: When running the statement user.age = 30; JS won’t throw any error but when we will try to retreve the value of user’s age it will be 25.

    Real-World Use Case:

    Use Object.freeze() in Redux to ensure state objects remain unchanged, preventing accidental mutations.

    2. Destructuring for Cleaner Code

    Destructuring makes it easy to extract values from objects and arrays, leading to cleaner and more readable code.

    const person = { name: "Bob", age: 28, city: "New York" };
    const { name, age } = person;
    console.log(name, age); // Bob 28

    Real-World Use Case:

    Use destructuring in function arguments for cleaner APIs:

    function greet({ name }) {
      console.log(`Hello, ${name}!`);
    }
    
    greet(person); // Hello, Bob!

    3. Intl API — Effortless Localization

    The Intl API provides built-in support for internationalization, allowing you to format dates, numbers, and currencies easily.

    Example:

    const date = new Date();
    console.log(new Intl.DateTimeFormat("fr-FR").format(date));

    Output:

    Real-World Use Case:

    Use Intl.NumberFormat for currency formatting:

    const price = 1234.56;
    console.log(
      new Intl.NumberFormat("en-US", { style: "currency", currency: "USD" }).format(
        price
      )
    );

    Output:

    Price formatted as USD

    4. Optional Chaining — Avoiding Errors on Undefined Properties

    Optional chaining (?.) prevents runtime errors when accessing deeply nested properties that may not exist.

    Example:

    const user = { profile: { name: "Charlie" } };
    console.log(user.profile?.name);
    console.log(user.address?.street);

    Output:

    Real-World Use Case:

    Useful when working with APIs where certain data fields may be missing.

    5. Nullish Coalescing Operator — Smarter Defaults

    The ?? operator assigns a default value only if the left-hand side is null or undefined (unlike ||, which also considers 0 and "" as falsy).

    const username = "";
    console.log(username || "Guest");
    console.log(username ?? "Guest");

    Output:

    Real-World Use Case:

    Use it for better default handling in user settings or configurations.

    6. Short-Circuit Evaluation for Concise Conditionals

    Instead of writing long if statements, use short-circuit evaluation for quick conditional assignments.

    Example:

    const isLoggedIn = true;
    const greeting = isLoggedIn && "Welcome back!";
    console.log(greeting);

    Output:

    7. Using map() for Transforming Arrays

    Instead of using forEach to modify arrays, prefer map() which returns a new array.

    Example:

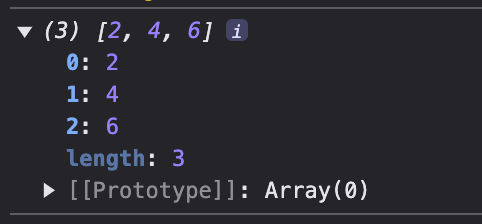
    const numbers = [1, 2, 3];
    const doubled = numbers.map((num) => num * 2);
    console.log(doubled);

    Output:

    8. Using reduce() for Complex Data Transformations

    The reduce() function allows you to accumulate values from an array into a single result.

    Exemple:

    const nums = [1, 2, 3, 4];
    const sum = nums.reduce((sum, num) => sum + num, 0);
    console.log("This is the sum ", sum);

    Output:

    9. Using setTimeout() in a Loop for Delayed Execution

    When using loops with timeouts, always use a closure to capture the correct loop variable.

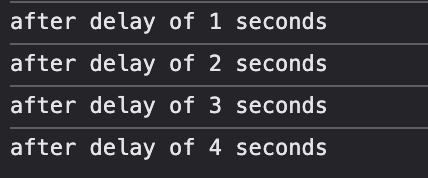
    for (let i = 1; i <= 4; i++) {
      setTimeout(() => console.log("after delay of " + i + " seconds"), i * 1000);
    }

    Output:

    This Outputs 1 2 3 with delay of 1, 2 , 3 and 4 seconds respectively.

    10. Debouncing to Optimize Performance

    Debouncing is useful when dealing with events like scrolling, resizing, or input changes to prevent excessive function calls.

    Example:

    function debounce(func, delay) {
      let timer;
      return function (...args) {
        clearTimeout(timer);
        timer = setTimeout(() => func.apply(this, args), delay);
      };
    }
    window.addEventListener(
      "resize",
      debounce(() => console.log("Resized!"), 500)
    );

    Real-World Use Case:

    Prevent excessive API calls when a user is typing in a search box.

    Final Thoughts

    Mastering JavaScript isn’t just about knowing the syntax — it’s about using the right tools and tricks to write better code. These 10 tricks can make your applications faster, cleaner, and more reliable. Try them out and integrate them into your daily coding habits!

  • 9 Must-Know Advanced Uses of Promises

    9 Must-Know Advanced Uses of Promises

    Overview

    The Promise object represents the eventual completion (or failure) of an asynchronous operation and its resulting value.

    A Promise is always in one of the following states:

    • Pending: The initial state, neither fulfilled nor rejected.
    • Fulfilled: The operation completed successfully.
    • Rejected: The operation failed.

    Unlike “old-style” callbacks, using Promises has the following conventions:

    • Callback functions will not be called until the current event loop completes.
    • Even if the asynchronous operation completes (successfully or unsuccessfully), callbacks added via then() afterward will still be called.
    • You can add multiple callbacks by calling then() multiple times, and they will be executed in the order they were added.

    The characteristic feature of Promises is chaining.

    Usage

    1. Promise.all([])

    When all Promise instances in the array succeed, it returns an array of success results in the order they were requested. If any Promise fails, it enters the failure callback.

    const p1 = new Promise((resolve) => {
      resolve(1);
    });
    const p2 = new Promise((resolve) => {
      resolve(1);
    });
    const p3 = Promise.resolve("ok");
    
    // If all promises succeed, result will be an array of 3 results.
    const result = Promise.all([p1, p2, p3]);
    // If one fails, the result is the failed promise's value.

    2. Promise.allSettled([])

    The execution will not fail; it returns an array corresponding to the status of each Promise instance in the input array.

    const p1 = Promise.resolve(1);
    const p2 = Promise.reject(-1);
    Promise.allSettled([p1, p2]).then((res) => {
      console.log(res);
    });
    // Output:
    /*
       [
        { status: 'fulfilled', value: 1 },
        { status: 'rejected', reason: -1 }
       ] 
    */

    3. Promise.any([])

    If any Promise in the input array fulfills, the returned instance will become fulfilled and return the value of the first fulfilled promise. If all are rejected, it will become rejected.

    const p1 = new Promise((resolve, reject) => {
      reject(1);
    });
    const p2 = new Promise((resolve, reject) => {
      reject(2);
    });
    const p3 = Promise.resolve("ok");
    
    Promise.any([p1, p2, p3]).then(
      (r) => console.log(r), // Outputs 'ok'
      (e) => console.log(e)
    );

    4. Promise.race([])

    As soon as any Promise in the array changes state, the state of the race method will change accordingly; the value of the first changed Promise will be passed to the race method’s callback.

    const p1 = new Promise((resolve) => {
      setTimeout(() => {
        resolve(10);
      }, 3000);
    });
    const p2 = new Promise((resolve, reject) => {
      setTimeout(() => {
        throw new Error("I encountered an error");
      }, 2000);
    });
    
    Promise.race([p1, p2]).then(
      (v) => console.log(v), // Outputs 10
      (e) => console.log(e)
    );

    Throwing an exception does not change the race state; it is still determined by p1.

    Advanced Uses

    Here are 9 advanced uses that help developers handle asynchronous operations more efficiently and elegantly.

    1. Concurrency Control

    Using Promise.all allows for parallel execution of multiple Promises, but to control the number of simultaneous requests, you can implement a concurrency control function.

    const concurrentPromises = (promises, limit) => {
      return new Promise((resolve, reject) => {
        let i = 0;
        let result = [];
        const executor = () => {
          if (i >= promises.length) {
            return resolve(result);
          }
          const promise = promises[i++];
          Promise.resolve(promise)
            .then((value) => {
              result.push(value);
              if (i < promises.length) {
                executor();
              } else {
                resolve(result);
              }
            })
            .catch(reject);
        };
        for (let j = 0; j < limit && j < promises.length; j++) {
          executor();
        }
      });
    };

    2. Promise Timeout

    Sometimes, you may want a Promise to automatically reject if it does not resolve within a certain time frame. This can be implemented as follows.

    const promiseWithTimeout = (promise, ms) =>
      Promise.race([
        promise,
        new Promise((resolve, reject) =>
          setTimeout(() => reject(new Error("Timeout after " + ms + "ms")), ms)
        ),
      ]);

    3. Cancelling Promises

    Native JavaScript Promises cannot be cancelled, but you can simulate cancellation by introducing controllable interrupt logic.

    const cancellablePromise = (promise) => {
      let isCanceled = false;
      const wrappedPromise = new Promise((resolve, reject) => {
        promise.then(
          (value) => (isCanceled ? reject({ isCanceled, value }) : resolve(value)),
          (error) => (isCanceled ? reject({ isCanceled, error }) : reject(error))
        );
      });
      return {
        promise: wrappedPromise,
        cancel() {
          isCanceled = true;
        },
      };
    };

    4. Sequential Execution of Promise Array

    Sometimes you need to execute a series of Promises in order, ensuring that the previous asynchronous operation completes before starting the next.

    const sequencePromises = (promises) =>
      promises.reduce((prev, next) => prev.then(() => next()), Promise.resolve());

    5. Retry Logic for Promises

    When a Promise is rejected due to temporary errors, you may want to retry its execution.

    const retryPromise = (promiseFn, maxAttempts, interval) => {
      return new Promise((resolve, reject) => {
        const attempt = (attemptNumber) => {
          if (attemptNumber === maxAttempts) {
            reject(new Error("Max attempts reached"));
            return;
          }
          promiseFn()
            .then(resolve)
            .catch(() => {
              setTimeout(() => {
                attempt(attemptNumber + 1);
              }, interval);
            });
        };
        attempt(0);
      });
    };

    6. Ensuring a Promise Resolves Only Once

    In some cases, you may want to ensure that a Promise resolves only once, even if resolve is called multiple times.

    const onceResolvedPromise = (executor) => {
      let isResolved = false;
      return new Promise((resolve, reject) => {
        executor((value) => {
          if (!isResolved) {
            isResolved = true;
            resolve(value);
          }
        }, reject);
      });
    };

    7. Using Promises Instead of Callbacks

    Promises provide a more standardized and convenient way to handle asynchronous operations by replacing callback functions.

    const callbackToPromise = (fn, ...args) => {
      return new Promise((resolve, reject) => {
        fn(...args, (error, result) => {
          if (error) {
            reject(error);
          } else {
            resolve(result);
          }
        });
      });
    };

    8. Dynamically Generating a Promise Chain

    In some situations, you may need to dynamically create a series of Promise chains based on different conditions.

    const tasks = [task1, task2, task3]; // Array of asynchronous tasks
    
    const promiseChain = tasks.reduce((chain, currentTask) => {
      return chain.then(currentTask);
    }, Promise.resolve());

    9. Using Promises to Implement a Simple Asynchronous Lock

    In a multi-threaded environment, you can use Promises to implement a simple asynchronous lock, ensuring that only one task can access shared resources at a time.

    let lock = Promise.resolve();
    
    const acquireLock = () => {
      let release;
      const waitLock = new Promise((resolve) => {
        release = resolve;
      });
      const tryAcquireLock = lock.then(() => release);
      lock = waitLock;
      return tryAcquireLock;
    };

    This code creates and resolves Promises continuously, implementing a simple FIFO queue to ensure that only one task can access shared resources. The lock variable represents whether there is a task currently executing, always pointing to the Promise of the task in progress. The acquireLock function requests permission to execute and creates a new Promise to wait for the current task to finish.

    Conclusion

    Promises are an indispensable part of modern JavaScript asynchronous programming. Mastering their advanced techniques will greatly enhance development efficiency and code quality. With the various methods outlined above, developers can handle complex asynchronous scenarios more confidently and write more readable, elegant, and robust code.