Author: Raju BK

  • NextJS send mail using nodemailer using SMTP

    NextJS send mail using nodemailer using SMTP

    import { sendMailAction } from "@/actions/action";
    
    const Page = () => {
      return (
        <form action={sendMailAction}>
          <button type="submit">Send Mail</button>
        </form>
      );
    };
    
    export default Page;
    
    "use server";
    
    import { sendMail } from "@/lib/node-mailer";
    
    export const sendMailAction = async () => {
      console.log("acgtion");
      try {
        await sendMail("[email protected]", "Test Subject", "This is a test");
      } catch (error) {
        console.log(error);
      }
    };
    import nodemailer from "nodemailer";
    
    export const sendMail = async (
      email: string,
      subject: string,
      text: string
    ) => {
      const transporter = nodemailer.createTransport({
        host: "your.smtp.server",
        port: 587,
        secure: false,
        auth: {
          user: "[email protected]",
          pass: "your_email_password",
        },
        tls: {
          rejectUnauthorized: false,
        },
      });
      try {
        await transporter.sendMail({
          from: "[email protected]",
          to: email,
          subject: subject,
          text: text,
        });
      } catch (error) {
        console.log(error);
      }
    };
    
  • WP Mail SMTP

    WP Mail SMTP

    add_filter( 'wp_mail_smtp_custom_options', function( $phpmailer ) {
        $phpmailer->SMTPOptions = array(
            'ssl' => array(
                'verify_peer' => false,
                'verify_peer_name' => false,
                'allow_self_signed' => true
            )
        );
        return $phpmailer;
    } );

  • Mail Server

    Mail Server

    ---------------------------> START DNS Records
    
    A Record to Server IP for mail.domain.tld
    CNAME autodiscover for mail.domain.tld
    CNAME autoconfig for mail.domain.tld
    MX Record for Domain.tld with Content mail.domain.tld
    SRV Record _autodiscover._tcp with Content 0 5 Port 443 Target mail.domain.tld
    TXT Record for Domain.tld with Content "v=spf1 ip4:YOUR_IPV4 ip6:YOUR_IPV6 -all"
    TXT Record for _DMARC with Content "v=DMARC1; p=quarantine; adkim=s; aspf=s"
    
    ---------------------------> END DNS Records
    ---------------------------> START Docker Installation
    
    apt update && apt upgrade -y
    dpkg-reconfigure tzdata
    
    sudo apt-get install ca-certificates curl 
    
    sudo install -m 0755 -d /etc/apt/keyrings 
    
    sudo curl -fsSL https://download.docker.com/linux/ubuntu/gpg -o /etc/apt/keyrings/docker.asc 
    
    sudo chmod a+r /etc/apt/keyrings/docker.asc 
    
    echo \ 
      "deb [arch=$(dpkg --print-architecture) signed-by=/etc/apt/keyrings/docker.asc] https://download.docker.com/linux/ubuntu \ 
     $(. /etc/os-release && echo "${UBUNTU_CODENAME:-$VERSION_CODENAME}") stable" | \ 
    sudo tee /etc/apt/sources.list.d/docker.list > /dev/null 
    
    sudo apt-get update 
    
    apt-get install docker-ce docker-ce-cli containerd.io docker-buildx-plugin docker-compose-plugin 
    
    systemctl start docker 
    
    systemctl enable docker 
    
    docker run hello-world
    
    ---------------------------> END Docker Installation
    ---------------------------> START Mailcow Installation
    
    mkdir /docker
    mkdir /docker/mailcow && cd /docker/mailcow
    
    git clone https://github.com/mailcow/mailcow-dockerized
    
    cd mailcow-dockerized
    
    ./generate_config.sh
    
    Vim mailcow.conf
    
    # SMTP
    sudo ufw allow 25/tcp
    
    # Submission
    sudo ufw allow 587/tcp
    
    # SMTPS (deprecated but sometimes used)
    sudo ufw allow 465/tcp
    
    # IMAP (unencrypted, STARTTLS)
    sudo ufw allow 143/tcp
    
    # IMAPS (SSL/TLS)
    sudo ufw allow 993/tcp
    
    # POP3 (unencrypted, STARTTLS)
    sudo ufw allow 110/tcp
    
    # POP3S (SSL/TLS)
    sudo ufw allow 995/tcp
    
    # Sieve (for mail filtering scripts like vacation replies)
    sudo ufw allow 4190/tcp
    
    sudo ufw status
    
    Vim docker-compose.yml
    
    docker compose up -d
    
    ---------------------------> END Mailcow Installation
    ---------------------------> START NGINX Installation
    mkdir /root/.secrets/certbot/
    vim /root/.secrets/certbot/cloudflare.ini
    
    dns_cloudflare_api_token = TOKEN
    
    chmod 600 /root/.secrets/certbot/cloudflare.ini 
    
    apt install certbot python3-certbot-dns-cloudflare
    
    sudo certbot certonly \
      --dns-cloudflare \
      --dns-cloudflare-credentials /root/.secrets/certbot/cloudflare.ini \
      -d '*.domain.tld' -d domain.tld \
      --preferred-challenges dns-01 \
      --agree-tos --no-eff-email --email [email protected]
    
    apt install nginx
    
    cd /etc/nginx/sites-available
    vim mail_domain_tld
    
    cd ../sites-enabled
    ln -s ../sites-available/mail_domain_tld
    
    nginx -t
    
    systemctl reload nginx
    
    ---------------------------> END NGINX Installation
    ---------------------------> START Mailcow Login
    
    admin
    moohoo
    
    ---------------------------> START Mailcow Login
    ---------------------------> START DNS Records Part 2
    
    TLSA for _25._tcp.mail.domain.tld 3 1 1 [Value from Mailcow]
    
    TXT for dkim._domainkey.domain.tld [Value from Mailcow]
    
    ---------------------------> END DNS Records Part 2
    
    server {
        server_name domain.tld mail.domain.tld autodiscover.domain.tld autoconfig.domain.tld;
        client_max_body_size 1G;
    
        location / {
            proxy_pass http://localhost:8080;
            proxy_set_header Host $host;
            proxy_set_header X-Real-IP $remote_addr;
            proxy_set_header X-Forwarded-For $proxy_add_x_forwarded_for;
            proxy_set_header X-Forwarded-Proto $scheme;
        }
    
        listen 443 ssl http2;
        listen [::]:443 ssl http2;
        ssl_certificate /etc/letsencrypt/live/domain.tld/fullchain.pem;
        ssl_certificate_key /etc/letsencrypt/live/domain.tld/privkey.pem;
    
        ssl_session_timeout 1d;
        ssl_session_cache shared:SSL:50m;
        ssl_session_tickets off;
    
        ssl_protocols TLSv1.2 TLSv1.3;
        ssl_prefer_server_ciphers on;
        ssl_ciphers 'ECDHE-ECDSA-CHACHA20-POLY1305:ECDHE-RSA-AES256-GCM-SHA384:ECDHE-RSA-AES128-GCM-SHA256';
    
        add_header Strict-Transport-Security "max-age=63072000; includeSubDomains; preload" always;
        add_header X-Frame-Options "SAMEORIGIN" always;
        add_header X-Content-Type-Options "nosniff" always;
        add_header Referrer-Policy "no-referrer" always;
        add_header Permissions-Policy "geolocation=(), microphone=()" always;
        add_header X-XSS-Protection "1; mode=block" always;
    }
    
    # HTTP redirect block
    server {
        listen 80;
        server_name domain.tld mail.domain.tld autodiscover.domain.tld autoconfig.domain.tld;
        return 301 https://$host$request_uri;
    }
  • Get letsencrypt ssl certificate from cloudflare

    Get letsencrypt ssl certificate from cloudflare

    Method 1:

    sudo apt install certbot python3-certbot-dns-cloudflare -y
    
    sudo nano /etc/letsencrypt/cloudflare.conf
    
    dns_cloudflare_email="<email-id>"
    dns_cloudflare_api_key="<api-key>" # Replace with your Cloudflare API key (Not API Token)
    
    sudo chmod 600 /etc/letsencrypt/cloudflare.conf
    
    sudo certbot certonly --dns-cloudflare --manual-public-ip-logging-ok -d sample.com -d *.sample.com --manual-auth-hook /etc/letsencrypt/acme-dns-auth.py

    Method 2:

    mkdir /root/.secrets/certbot/
    vim /root/.secrets/certbot/cloudflare.ini
    
    dns_cloudflare_api_token = TOKEN
    
    chmod 600 /root/.secrets/certbot/cloudflare.ini 
    
    apt install certbot python3-certbot-dns-cloudflare
    
    sudo certbot certonly \
      --dns-cloudflare \
      --dns-cloudflare-credentials /root/.secrets/certbot/cloudflare.ini \
      -d '*.domain.tld' -d domain.tld \
      --preferred-challenges dns-01 \
      --agree-tos --no-eff-email --email [email protected]
    
    apt install nginx
    
    cd /etc/nginx/sites-available
    vim mail_domain_tld
    
    cd ../sites-enabled
    ln -s ../sites-available/mail_domain_tld
    
    nginx -t
    
    systemctl reload nginx
  • WordPress with Nginx and ssl

    WordPress with Nginx and ssl

    Install Nginx on Ubuntu 20.04 LTS

    sudo apt update && sudo apt upgrade -y
    sudo apt install nginx -y
    sudo systemctl start nginx
    sudo systemctl enable nginx

    Install PHP 8.3 and its dependencies

    sudo apt install software-properties-common -y
    sudo add-apt-repository ppa:ondrej/php
    sudo apt update
    sudo apt install php8.3-fpm php8.3-mysql php8.3-curl php8.3-mbstring php8.3-xml php8.3-zip php8.3-gd -y
    
    sudo systemctl start php8.3-fpm
    sudo systemctl enable php8.3-fpm
    
    php -v

    Install MariaDB and its dependencies

    sudo apt install mariadb-server -y
    
    sudo systemctl start mariadb
    sudo systemctl enable mariadb
    
    sudo mysql_secure_installation

    Create a new database and user for WordPress

    sudo mysql -u root -p
    
    CREATE DATABASE wordpress;
    CREATE USER 'wpuser'@'localhost' IDENTIFIED BY 'secure_password'; # Replace with your desired password
    GRANT ALL PRIVILEGES ON wordpress.* TO 'wpuser'@'localhost';
    FLUSH PRIVILEGES;
    EXIT;

    Download and extract WordPress

    cd /var/www/html
    
    sudo wget https://wordpress.org/latest.tar.gz
    sudo tar -xvzf latest.tar.gz
    sudo rm latest.tar.gz
    
    sudo chown -R www-data:www-data /var/www/html/wordpress
    sudo chmod -R 755 /var/www/html/wordpress
    
    sudo mv /var/www/html/wordpress/wp-config-sample.php /var/www/html/wordpress/wp-config.php
    
    sudo nano /var/www/html/wordpress/wp-config.php
    
    define( 'DB_NAME', 'wordpress' );
    define( 'DB_USER', 'wpuser' );
    define( 'DB_PASSWORD', 'secure_password' ); # Replace with your password
    define( 'DB_HOST', 'localhost' );

    Create a new Nginx configuration file for WordPress

    sudo nano /etc/nginx/sites-available/wordpress
    
    server {
        listen 80;
        server_name wp.rajubk.com;
    
        return 301 https://wp.rajubk.com$request_uri;
    }
    
    server {
        listen 443 ssl http2;
        server_name wp.rajubk.com;
    
        root /var/www/html/wordpress;
        index index.php;
    
        # SSL parameters
        ssl_certificate /etc/letsencrypt/live/rajubk.com/fullchain.pem;
        ssl_certificate_key /etc/letsencrypt/live/rajubk.com/privkey.pem;
        ssl_trusted_certificate /etc/letsencrypt/live/rajubk.com/chain.pem;
    
        # Log files
        access_log /var/log/nginx/sample.com.access.log;
        error_log /var/log/nginx/sample.com.error.log;
    
        location = /favicon.ico {
            log_not_found off;
            access_log off;
        }
    
        location = /robots.txt {
            allow all;
            log_not_found off;
            access_log off;
        }
    
        location / {
            try_files $uri $uri/ /index.php?$args;
        }
    
        location ~ \.php$ {
            include snippets/fastcgi-php.conf;
            fastcgi_pass unix:/run/php/php8.3-fpm.sock;
            fastcgi_param SCRIPT_FILENAME $document_root$fastcgi_script_name;
            include fastcgi_params;
        }
    
        location ~* \.(js|css|png|jpg|jpeg|gif|ico|svg)$ {
            expires max;
            log_not_found off;
        }
    }
    
    sudo ln -s /etc/nginx/sites-available/wordpress /etc/nginx/sites-enabled/
    
    sudo nginx -t
    
    sudo systemctl reload nginx
  • Advanced JavaScript Techniques

    Advanced JavaScript Techniques

    JavaScript has evolved significantly over the years, becoming one of the most powerful and versatile programming languages in web development. However, writing efficient, scalable, and maintainable JavaScript code requires mastering advanced techniques. By leveraging modern JavaScript patterns and features, developers can improve execution speed, enhance code modularity, and simplify complex tasks.

    This article explores ten essential advanced JavaScript techniques that will elevate your coding skills and help you build robust applications. From closures and destructuring to metaprogramming and memory management, these techniques will give you the edge needed to write professional-level JavaScript.

    1. Asynchronous JavaScript with Async/Await

    Handling asynchronous tasks effectively is crucial for modern web development. The async/await syntax provides a clean and readable way to manage asynchronous operations, replacing traditional callback-based approaches.

    Example:

    async function fetchUserData(userId) {
      const response = await new Promise((resolve) =>
        setTimeout(() => resolve({ id: userId, name: "John Doe" }), 1000)
      );
      return response;
    }
    
    async function displayUserData() {
      try {
        console.log("Fetching user data...");
        const user = await fetchUserData(123);
        console.log("User data:", user);
      } catch (error) {
        console.error("Error fetching user data:", error);
      }
    }
    
    displayUserData();

    Why Use Async/Await?

    • Improves readability by resembling synchronous code.
    • Simplifies error handling with try/catch.
    • Reduces deeply nested callback structures.

    2. Proxies for Intercepting and Enhancing Object Behavior

    JavaScript’s Proxy object allows developers to intercept and modify fundamental operations on objects, making them highly useful for creating custom behaviors such as logging, validation, and dynamic property handling.

    Example:

    const target = { name: "John" };
    const handler = {
      get: (obj, prop) => `${prop} is ${obj[prop]}`,
      set: (obj, prop, value) => {
        console.log(`Setting ${prop} to ${value}`);
        obj[prop] = value;
        return true;
      },
    };
    const proxy = new Proxy(target, handler);
    
    console.log(proxy.name); // "name is John"
    proxy.age = 30; // "Setting age to 30"

    Why Use Proxies?

    • Validation: Ensure properties meet certain criteria before being set.
    • Logging: Track access and modifications to object properties.
    • Default Values: Provide fallback values for undefined properties.
    • Computed Properties: Generate property values on-the-fly.

    By using Proxies, you can add powerful meta-programming capabilities to your JavaScript code, enabling more flexible and dynamic object interactions.

    3. Debouncing and Throttling for Performance Optimization

    Handling frequent user events like scrolling, resizing, or keypresses can impact performance. Debouncing and throttling help control function execution frequency.

    Debouncing: Debouncing delays the execution of a function until a specified time has passed since the last event trigger. This is useful for optimizing performance in cases like search input fields and window resize events.

    function debounce(func, delay) {
      let timeout;
      return function (...args) {
        clearTimeout(timeout);
        timeout = setTimeout(() => func.apply(this, args), delay);
      };
    }

    Throttling: Throttling ensures that a function is executed at most once within a given time frame, preventing excessive function calls.

    function throttle(func, limit) {
      let inThrottle;
      return function (...args) {
        if (!inThrottle) {
          func.apply(this, args);
          inThrottle = true;
          setTimeout(() => (inThrottle = false), limit);
        }
      };
    }

    These techniques improve performance by limiting how often a function runs, which is essential for user input handling and optimizing animations.

    4. Using Proxies to Intercept Object Behavior

    Proxy objects allow you to intercept and redefine fundamental operations on objects, such as property access, assignment, and function calls. This is useful for validation, logging, or building reactive frameworks.

    Example:

    const target = {
      message1: "hello",
      message2: "everyone",
    };
    
    const handler = {
      get(target, prop, receiver) {
        if (prop === "message2") {
          return "world";
        }
        return Reflect.get(...arguments);
      },
    };
    
    const proxy = new Proxy(target, handler);
    
    console.log(proxy.message1); // hello
    console.log(proxy.message2); // world

    Why Use Proxies?

    • Provides dynamic control over property access and modification.
    • Enables data validation, logging, and computed properties.
    • Useful for creating reactive programming frameworks and API wrappers.

    Proxies allow developers to intercept and modify object behavior, making them essential for metaprogramming and advanced JavaScript development.

    5. Optional Chaining (?.) for Safe Property Access

    Optional chaining (?.) provides a way to access deeply nested object properties without worrying about runtime errors due to undefined or null values.

    Example:

    const user = { profile: { name: "Alice" } };
    console.log(user.profile?.name); // 'Alice'
    console.log(user.address?.city); // undefined (no error)

    Why Use It?

    • Prevents runtime errors from missing properties.
    • Reduces excessive if statements for property checks.
    • Especially useful when working with API responses.

    6. Offload Heavy Tasks with Web Workers

    JavaScript is single-threaded, but Web Workers let you run scripts in background threads. Use them for CPU-heavy tasks like data processing or image manipulation:

    // main.js
    const worker = new Worker("worker.js");
    worker.postMessage(data);
    worker.onmessage = (e) => updateUI(e.data);
    
    // worker.js
    self.onmessage = (e) => {
      const result = processData(e.data);
      self.postMessage(result);
    };

    Why Use Web Workers?

    • Prevents UI freezes by offloading CPU-intensive tasks to background threads.
    • Enhances application responsiveness and performance.
    • Ideal for data processing, image manipulation, and real-time computations.

    Using Web Workers ensures that heavy computations do not block the main thread, leading to a smoother user experience.

    7. Master Memory Management

    Memory leaks silently degrade performance. Avoid globals, use WeakMap/WeakSet for caches, and monitor leaks with DevTools:

    const cache = new WeakMap();  
    function computeExpensiveValue(obj) {
      if (!cache.has(obj)) {
        const result = /* heavy computation */;
        cache.set(obj, result);
      }
      return cache.get(obj);
    }

    Why Use It?

    • Prevents memory leaks by allowing garbage collection of unused objects.
    • Efficient for caching without affecting memory consumption.
    • Useful for managing private data within objects.

    Using WeakMap ensures that cached objects are automatically cleaned up when no longer needed, preventing unnecessary memory usage.

    8. Currying Functions for Better Reusability

    Currying transforms a function that takes multiple arguments into a series of functions, each taking one argument. This technique makes functions more reusable and allows for partial application.

    // Basic curry function
    function curry(fn) {
      return function curried(...args) {
        if (args.length >= fn.length) {
          return fn.apply(this, args);
        } else {
          return function (...nextArgs) {
            return curried.apply(this, args.concat(nextArgs));
          };
        }
      };
    }
    
    // Usage
    const add = (a, b, c) => a + b + c;
    const curriedAdd = curry(add);
    console.log(curriedAdd(1)(2)(3));

    Why Use It?

    • Enables partial application of functions for better reusability.
    • Enhances functional programming by making functions more flexible.
    • Improves readability and simplifies repetitive tasks.

    Currying is particularly useful for creating highly reusable utility functions in modern JavaScript applications.

    9. Closures for Private State Management

    Closures are one of JavaScript’s most powerful features. They allow functions to remember and access variables from their outer scope even after the outer function has finished executing. This makes them particularly useful for encapsulating private state and preventing unintended modifications.

    Example:

    function createCounter() {
      let count = 0;
      return function () {
        count++;
        return count;
      };
    }
    
    const counter = createCounter();
    console.log(counter()); // 1
    console.log(counter()); // 2
    console.log(counter()); // 3

    Why Use Closures?

    • Encapsulation: Keep variables private and inaccessible from the global scope.
    • Data Integrity: Maintain controlled access to data, preventing unintended modifications.
    • Memory Efficiency: Create function factories that share behavior but maintain separate state.
    • Callback Functions: Preserve context in asynchronous operations.

    Closures are commonly used in event handlers, factory functions, and callback functions to preserve state efficiently.

    10. Destructuring for More Concise and Readable Code

    Destructuring simplifies the process of extracting values from arrays and objects, making your code cleaner and more readable. This technique is particularly useful when working with complex data structures or API responses.

    Object Destructuring:

    const person = { name: "Jack", age: 20 };
    const { name, age } = person;
    
    console.log(name); // 'Jack'
    console.log(age); // 20

    Array Destructuring:

    const numbers = [1, 2, 3];
    const [first, second] = numbers;
    console.log(first); // 1
    console.log(second); // 2

    Why Use Destructuring?

    • Reduces redundant variable assignments.
    • Enhances code readability.
    • Especially useful when working with API responses or function parameters.

    By leveraging destructuring, you can write more concise and expressive code, making it easier to work with complex data structures and improving overall code readability.

    Conclusion

    By mastering these advanced JavaScript techniques, developers can write cleaner, more efficient, and scalable code. Understanding closures, destructuring, proxies, async/await, and performance optimizations like debouncing and throttling will enhance your ability to build high-performance applications. Additionally, incorporating best practices like the module pattern and optional chaining will further improve your coding efficiency.

  • 10 JavaScript Tricks every developer should know

    10 JavaScript Tricks every developer should know

    JavaScript is a powerful language, but mastering it requires more than just knowing the basics. The real magic lies in the hidden gems — lesser-known but powerful tricks that can make your code cleaner, more efficient, and easier to maintain. Whether you’re a beginner or a seasoned developer, these 10 JavaScript tricks will help you level up your coding game! 👾

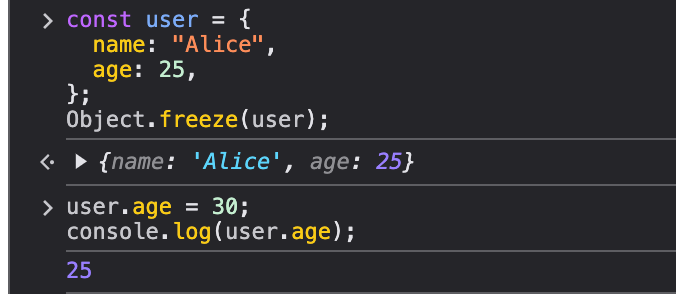
    1. Object.freeze() — Making Objects Immutable

    In JavaScript, by default objects are mutable, meaning you can change their properties after creation. But what if you need to prevent modifications? That’s where Object.freeze() comes in handy.

    const user = {
      name: "Alice",
      age: 25,
    };
    
    Object.freeze(user);
    
    user.age = 30; // This won't work, as the object is frozen
    console.log(user.age); // 25

    Note: When running the statement user.age = 30; JS won’t throw any error but when we will try to retreve the value of user’s age it will be 25.

    Real-World Use Case:

    Use Object.freeze() in Redux to ensure state objects remain unchanged, preventing accidental mutations.

    2. Destructuring for Cleaner Code

    Destructuring makes it easy to extract values from objects and arrays, leading to cleaner and more readable code.

    const person = { name: "Bob", age: 28, city: "New York" };
    const { name, age } = person;
    console.log(name, age); // Bob 28

    Real-World Use Case:

    Use destructuring in function arguments for cleaner APIs:

    function greet({ name }) {
      console.log(`Hello, ${name}!`);
    }
    
    greet(person); // Hello, Bob!

    3. Intl API — Effortless Localization

    The Intl API provides built-in support for internationalization, allowing you to format dates, numbers, and currencies easily.

    Example:

    const date = new Date();
    console.log(new Intl.DateTimeFormat("fr-FR").format(date));

    Output:

    Real-World Use Case:

    Use Intl.NumberFormat for currency formatting:

    const price = 1234.56;
    console.log(
      new Intl.NumberFormat("en-US", { style: "currency", currency: "USD" }).format(
        price
      )
    );

    Output:

    Price formatted as USD

    4. Optional Chaining — Avoiding Errors on Undefined Properties

    Optional chaining (?.) prevents runtime errors when accessing deeply nested properties that may not exist.

    Example:

    const user = { profile: { name: "Charlie" } };
    console.log(user.profile?.name);
    console.log(user.address?.street);

    Output:

    Real-World Use Case:

    Useful when working with APIs where certain data fields may be missing.

    5. Nullish Coalescing Operator — Smarter Defaults

    The ?? operator assigns a default value only if the left-hand side is null or undefined (unlike ||, which also considers 0 and "" as falsy).

    const username = "";
    console.log(username || "Guest");
    console.log(username ?? "Guest");

    Output:

    Real-World Use Case:

    Use it for better default handling in user settings or configurations.

    6. Short-Circuit Evaluation for Concise Conditionals

    Instead of writing long if statements, use short-circuit evaluation for quick conditional assignments.

    Example:

    const isLoggedIn = true;
    const greeting = isLoggedIn && "Welcome back!";
    console.log(greeting);

    Output:

    7. Using map() for Transforming Arrays

    Instead of using forEach to modify arrays, prefer map() which returns a new array.

    Example:

    const numbers = [1, 2, 3];
    const doubled = numbers.map((num) => num * 2);
    console.log(doubled);

    Output:

    8. Using reduce() for Complex Data Transformations

    The reduce() function allows you to accumulate values from an array into a single result.

    Exemple:

    const nums = [1, 2, 3, 4];
    const sum = nums.reduce((sum, num) => sum + num, 0);
    console.log("This is the sum ", sum);

    Output:

    9. Using setTimeout() in a Loop for Delayed Execution

    When using loops with timeouts, always use a closure to capture the correct loop variable.

    for (let i = 1; i <= 4; i++) {
      setTimeout(() => console.log("after delay of " + i + " seconds"), i * 1000);
    }

    Output:

    This Outputs 1 2 3 with delay of 1, 2 , 3 and 4 seconds respectively.

    10. Debouncing to Optimize Performance

    Debouncing is useful when dealing with events like scrolling, resizing, or input changes to prevent excessive function calls.

    Example:

    function debounce(func, delay) {
      let timer;
      return function (...args) {
        clearTimeout(timer);
        timer = setTimeout(() => func.apply(this, args), delay);
      };
    }
    window.addEventListener(
      "resize",
      debounce(() => console.log("Resized!"), 500)
    );

    Real-World Use Case:

    Prevent excessive API calls when a user is typing in a search box.

    Final Thoughts

    Mastering JavaScript isn’t just about knowing the syntax — it’s about using the right tools and tricks to write better code. These 10 tricks can make your applications faster, cleaner, and more reliable. Try them out and integrate them into your daily coding habits!

  • Context Splitting in React: A Technique to Prevent Unnecessary Rerenders

    Context Splitting in React: A Technique to Prevent Unnecessary Rerenders

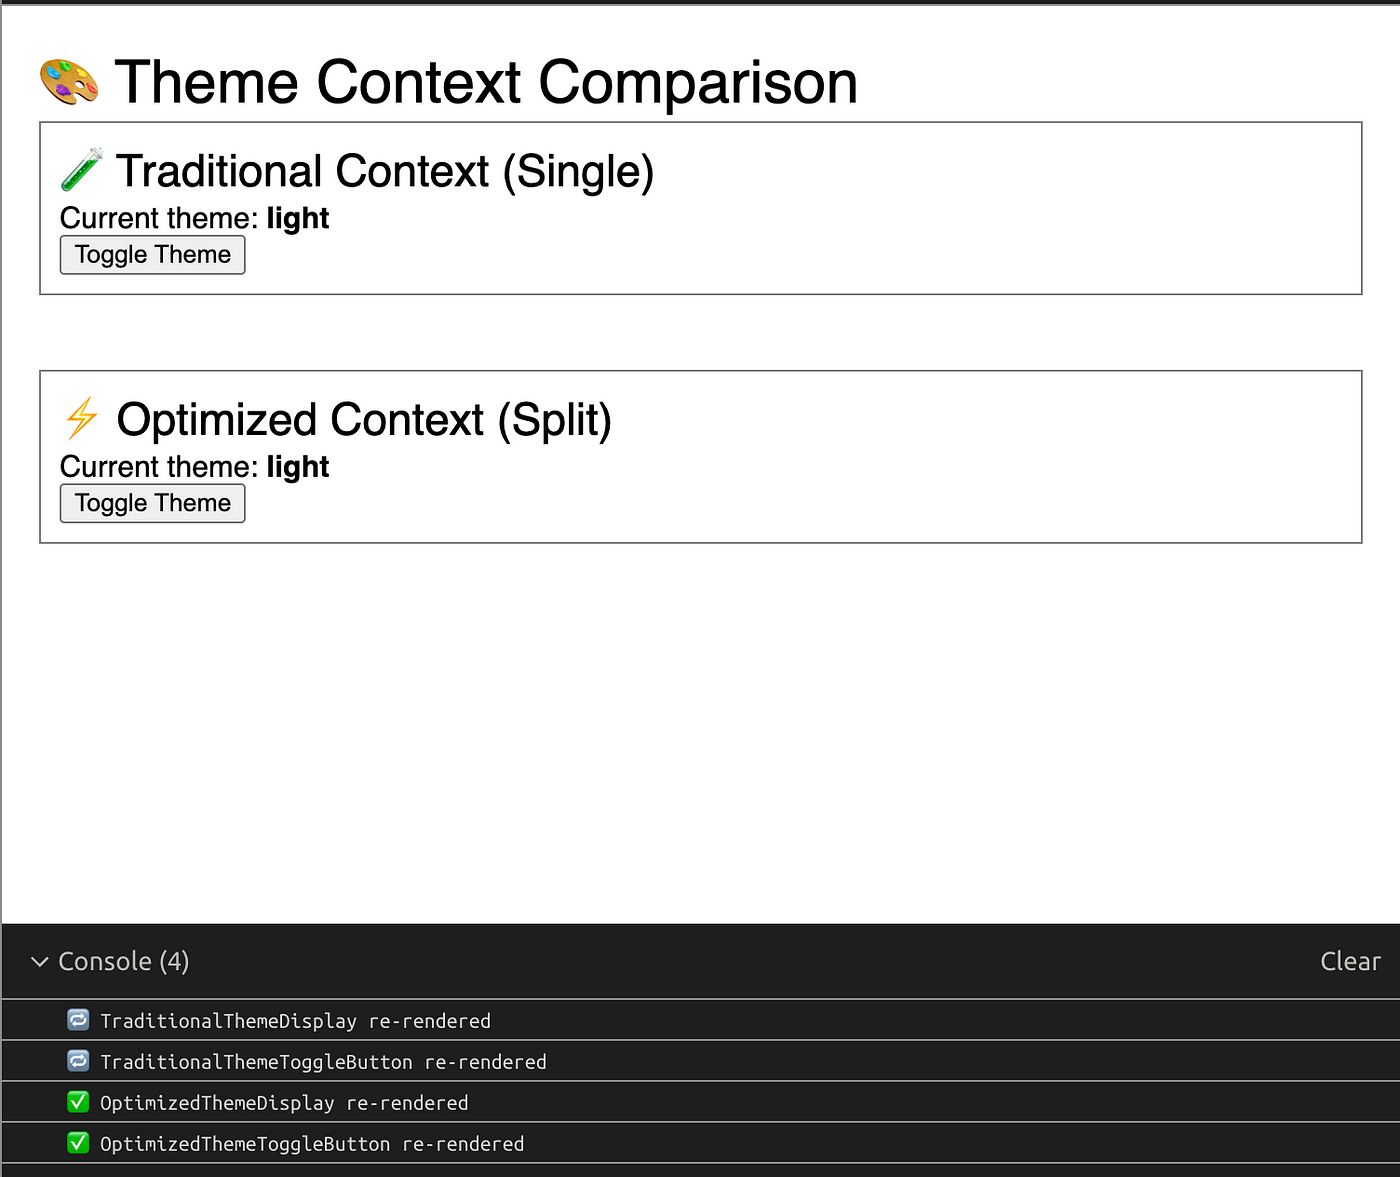
    One of the most common issues developers face is managing rerenders, especially when working with Context API. Today, I want to share a powerful technique that quite known but… 😄

    The Problem with Traditional Context

    Before diving into the solution, let’s understand the problem. When using React’s Context API in the traditional way, any component that consumes a context will rerender whenever any value within that context changes.

    Consider this example:

    // Traditional Context approach
    const ThemeContext = React.createContext({
      theme: "light",
      setTheme: () => {},
    });
    
    function ThemeProvider({ children }) {
      const [theme, setTheme] = useState("light");
    
      return (
        <ThemeContext.Provider value={{ theme, setTheme }}>
          {children}
        </ThemeContext.Provider>
      );
    }
    
    function ThemeDisplay() {
      const { theme } = useContext(ThemeContext);
      console.log("ThemeDisplay rendering");
      return <div>Current theme: {theme}</div>;
    }
    
    function ThemeToggle() {
      const { setTheme } = useContext(ThemeContext);
      console.log("ThemeToggle rendering");
    
      return (
        <button
          onClick={() => setTheme((prev) => (prev === "light" ? "dark" : "light"))}
        >
          Toggle Theme
        </button>
      );
    }

    The issue here is that both ThemeDisplay and ThemeToggle will rerender whenever the theme changes, even though ThemeToggle only needs setTheme and doesn’t actually use the current theme value in its rendering.

    The Possible Solution: Context Splitting 💡

    The context splitting pattern addresses this problem by separating our context into two distinct contexts:

    1. data context that holds just the state (e.g., theme)
    2. setter context that holds just the updater function (e.g., setTheme)

    Here’s how it looks in practice:

    // Split Context approach
    const ThemeContext = React.createContext("light");
    const ThemeSetterContext = React.createContext(() => {});
    
    function ThemeProvider({ children }) {
      const [theme, setTheme] = useState("light");
    
      return (
        <ThemeContext.Provider value={theme}>
          <ThemeSetterContext.Provider value={setTheme}>
            {children}
          </ThemeSetterContext.Provider>
        </ThemeContext.Provider>
      );
    }
    
    function ThemeDisplay() {
      const theme = useContext(ThemeContext);
      console.log("ThemeDisplay rendering");
      return <div>Current theme: {theme}</div>;
    }
    
    function ThemeToggle() {
      const setTheme = useContext(ThemeSetterContext);
      console.log("ThemeToggle rendering");
    
      return (
        <button
          onClick={() => setTheme((prev) => (prev === "light" ? "dark" : "light"))}
        >
          Toggle Theme
        </button>
      );
    }

    With this pattern, when the theme changes:

    • ThemeDisplay rerenders (as it should since it displays the theme)
    • ThemeToggle does NOT rerender because it only consumes the setter context, which never changes (the setter function reference remains stable)

    Complete Example with Rerender Counting 🧪

    Let’s create a more complete example that demonstrates the difference between the traditional and split context approaches. We’ll add rerender counters to visualize the performance impact:

    import React, { useState, useContext, memo } from "react";
    import ReactDOM from "react-dom/client";
    
    /* ========== Traditional Context (Single) ========== */
    const TraditionalThemeContext = React.createContext({
      theme: "light",
      setTheme: () => {},
    });
    
    const TraditionalThemeProvider = ({ children }) => {
      const [theme, setTheme] = useState("light");
      return (
        <TraditionalThemeContext.Provider value={{ theme, setTheme }}>
          {children}
        </TraditionalThemeContext.Provider>
      );
    };
    
    const TraditionalThemeDisplay = memo(() => {
      const { theme } = useContext(TraditionalThemeContext);
      console.log("🔁 TraditionalThemeDisplay re-rendered");
      return (
        <div>
          Current theme: <strong>{theme}</strong>
        </div>
      );
    });
    
    const TraditionalThemeToggleButton = memo(() => {
      const { setTheme } = useContext(TraditionalThemeContext);
      console.log("🔁 TraditionalThemeToggleButton re-rendered");
      return (
        <button
          onClick={() => setTheme((prev) => (prev === "light" ? "dark" : "light"))}
        >
          Toggle Theme
        </button>
      );
    });
    
    /* ========== Optimized Context (Split) ========== */
    const ThemeContext = React.createContext("light");
    const SetThemeContext = React.createContext(() => {});
    
    const ThemeProvider = ({ children }) => {
      const [theme, setTheme] = useState("light");
    
      return (
        <ThemeContext.Provider value={theme}>
          <SetThemeContext.Provider value={setTheme}>
            {children}
          </SetThemeContext.Provider>
        </ThemeContext.Provider>
      );
    };
    
    const OptimizedThemeDisplay = memo(() => {
      const theme = useContext(ThemeContext);
      console.log("✅ OptimizedThemeDisplay re-rendered");
      return (
        <div>
          Current theme: <strong>{theme}</strong>
        </div>
      );
    });
    
    const OptimizedThemeToggleButton = memo(() => {
      const setTheme = useContext(SetThemeContext);
      console.log("✅ OptimizedThemeToggleButton re-rendered");
      return (
        <button
          onClick={() => setTheme((prev) => (prev === "light" ? "dark" : "light"))}
        >
          Toggle Theme
        </button>
      );
    });
    
    /* ========== App ========== */
    export const App = () => {
      return (
        <div style={{ fontFamily: "sans-serif", padding: 20 }}>
          <h1>🎨 Theme Context Comparison</h1>
    
          <div style={{ marginBottom: 40, padding: 10, border: "1px solid gray" }}>
            <h2>🧪 Traditional Context (Single)</h2>
            <TraditionalThemeProvider>
              <TraditionalThemeDisplay />
              <TraditionalThemeToggleButton />
            </TraditionalThemeProvider>
          </div>
    
          <div style={{ marginBottom: 40, padding: 10, border: "1px solid gray" }}>
            <h2>⚡ Optimized Context (Split)</h2>
            <ThemeProvider>
              <OptimizedThemeDisplay />
              <OptimizedThemeToggleButton />
            </ThemeProvider>
          </div>
        </div>
      );
    };

    Initial render:

    Now lets see what happens when we click toggle buttons

    What to Look for in Console

    Each toggle will log:

    Traditional Context:

    🔁 TraditionalThemeDisplay re-rendered

    🔁 TraditionalThemeToggleButton re-rendered ✅ ← re-renders unnecessarily

    Optimized Context:

    ✅ OptimizedThemeDisplay re-rendered

    ✅ OptimizedThemeToggleButton re-rendered ❌ ← does NOT re-render

    Optimizing with useMemo

    We can optimize the traditional approach somewhat by using useMemo to prevent the context value object from being recreated on every render:

    function OptimizedTraditionalProvider({ children }) {
      const [theme, setTheme] = useState("light");
    
      // Memoize the value object to prevent unnecessary context changes
      const value = useMemo(
        () => ({
          theme,
          setTheme,
        }),
        [theme]
      );
    
      return (
        <TraditionalThemeContext.Provider value={value}>
          {children}
        </TraditionalThemeContext.Provider>
      );
    }

    This helps, but still has the fundamental issue that components consuming only setTheme will rerender when theme changes. The split context approach solves this problem more elegantly.

    When to Use Context Splitting

    Context splitting is particularly valuable when:

    1. You have many components that only need to update state but don’t need to read it
    2. You have expensive components that should only rerender when absolutely necessary
    3. Your app has deep component trees where performance optimization matters

    Potential Downsides

    While context splitting is powerful, it does come with some trade-offs:

    1. Increased Complexity — Managing two contexts instead of one adds some boilerplate
    2. Provider Nesting — You end up with more nested providers in your component tree
    3. Mental Overhead — Developers need to choose the right context for each use case

    Custom Hooks for Clean API

    To make this pattern more developer-friendly, you can create custom hooks:

    function useTheme() {
      return useContext(ThemeContext);
    }
    
    function useSetTheme() {
      return useContext(ThemeSetterContext);
    }
    
    // Usage
    function MyComponent() {
      const theme = useTheme();
      const setTheme = useSetTheme();
      // ...
    }

    Measuring the Performance Impact

    When you run the demo code provided above, you’ll see a clear difference in render counts:

    1. With the traditional context, both the reader and toggler components rerender when the theme changes
    2. With the split context, only the reader rerenders while the toggler’s render count stays the same

    This performance difference might seem small in a simple example, but in a real application with dozens or hundreds of components consuming context, the impact can be substantial.

    Conclusion 🚀

    Context splitting is a powerful technique for optimizing React applications that use the Context API. By separating your state and setter functions into different contexts, you can ensure components only rerender when the specific data they consume changes.

    While this technique adds some complexity to your codebase, the performance benefits can be visible in larger applications.

  • How to Cache in React and Next.js Apps with Best Practices for 2025

    How to Cache in React and Next.js Apps with Best Practices for 2025

    In modern web development, speed and efficiency are important. Whether you’re building with React or using Next.js, caching has become one of the most important techniques for improving performance, reducing server load, and making user experience better.

    With the latest updates in Next.js and advancements in the React ecosystem, caching strategies have improved, and learning them is key for any serious developer. In this blog, we’ll learn how caching works in both React and Next.js, go through best practices, and highlight real-world examples that you can apply today.

    What is Caching?

    Caching refers to the process of storing data temporarily so future requests can be served faster. In the context of web applications, caching can occur at various levels:

    • Browser caching (storing static assets)
    • Client-side data caching (with libraries like SWR or React Query)
    • Server-side caching (Next.js API routes or server actions)
    • CDN caching (via edge networks)

    Effective caching minimizes redundant data fetching, accelerates loading times, and improves the perceived performance of your application.

    Caching in React Applications

    React doesn’t have built-in caching, but the community provides powerful tools to manage cache effectively on the client side.

    1. React Query and SWR for Data Caching

    These libraries help cache remote data on the client side and reduce unnecessary requests:

    import useSWR from "swr";
    
    const fetcher = (url: string) => fetch(url).then((res) => res.json());
    
    export default function User() {
      const { data, error } = useSWR("/api/user", fetcher);
    
      if (error) return <div>Failed to load</div>;
      if (!data) return <div>Loading...</div>;
      return <div>Hello {data.name}</div>;
    }

    Best Practices:

    • Set revalidation intervals (revalidateOnFocusdedupingInterval)
    • Use optimistic updates for a snappy UI
    • Preload data when possible

    2. Memoization for Component-Level Caching

    For expensive computations and rendering logic:

    import { useMemo } from "react";
    
    const ExpensiveComponent = ({ items }) => {
      const sortedItems = useMemo(() => items.sort(), [items]);
      return <List items={sortedItems} />;
    };

    3. LocalStorage and SessionStorage

    Persisting client state across sessions:

    useEffect(() => {
      const cachedData = localStorage.getItem("userData");
      if (cachedData) {
        setUser(JSON.parse(cachedData));
      }
    }, []);

    Server-Side Caching in Next.js (Latest App Router)

    With the App Router in Next.js 13+ and the stability in v14+, server actions and data caching have become much more robust and declarative.

    1. Caching with fetch and cache Option

    Next.js allows caching behavior to be specified per request:

    export async function getProduct(productId: string) {
      const res = await fetch(`https://api.example.com/products/${productId}`, {
        next: { revalidate: 60 }, // ISR (Incremental Static Regeneration)
      });
      return res.json();
    }

    Best Practices:

    • Use cache: 'force-cache' for static content
    • Use revalidate to regenerate content periodically
    • Use cache: 'no-store' for dynamic or user-specific data

    2. Using Server Actions and React Server Components (RSC)

    // app/actions.ts
    "use server";
    
    export async function saveData(formData: FormData) {
      const name = formData.get("name");
      // Save to database or perform API calls
    }

    Server actions in the App Router allow you to cache server-side logic and fetch results in React Server Components without hydration.

    3. Using generateStaticParams and generateMetadata

    These methods help Next.js know which routes to pre-build and cache efficiently:

    export async function generateStaticParams() {
      const products = await fetchProducts();
      return products.map((product) => ({ id: product.id }));
    }

    Cache Invalidation Strategies

    Proper cache invalidation ensures that stale data is replaced with up-to-date content:

    • Time-based (revalidate: 60 seconds)
    • On-demand revalidation (res.revalidate in API route)
    • Tag-based revalidation (coming soon in Next.js)
    • Mutations trigger refetch in SWR/React Query

    CDN and Edge Caching with Next.js

    Vercel and other hosting providers like Netlify and Cloudflare deploy Next.js apps globally. Edge caching improves load time by serving users from the nearest region.

    Tips:

    • Leverage Edge Functions for dynamic personalization
    • Use headers like Cache-Control effectively
    • Deploy static assets via CDN for better global performance

    Final Best Practices

    • Prefer static rendering where possible
    • Cache API calls both on server and client
    • Use persistent cache (IndexedDB/localStorage) when applicable
    • Memoize expensive computations
    • Profile and audit cache hits/misses with dev tools

    Conclusion

    Caching in React and Next.js is no longer optional — it’s essential for delivering fast, resilient, and scalable applications. Whether you’re fetching data client-side or leveraging powerful server-side features in Next.js App Router, the right caching strategy can drastically improve your app’s performance and user satisfaction. As frameworks evolve, staying updated with caching best practices ensures your apps remain performant and competitive.

    By applying these techniques, you not only enhance the speed and reliability of your applications but also reduce infrastructure costs and improve SEO outcomes. Start caching smartly today and take your web performance to the next level.

  • Top 7 Features in Next.js 15 That Will Supercharge Your Web Apps

    Top 7 Features in Next.js 15 That Will Supercharge Your Web Apps

    In today’s fast-paced web ecosystem, developers need tools that are flexible, performant, and future-ready. Next.js 15 delivers on all fronts. Whether you’re building static websites, dynamic dashboards, or enterprise-grade applications, this version introduces groundbreaking features that take developer productivity and user experience to the next level.

    In this post, we’ll walk through the top 7 features in Next.js 15 that are engineered to supercharge your web apps — plus practical use cases, code examples, and why they matter.

    1. 🔄 React Server Actions (Stable with React 19)

    Say goodbye to complex API routes.
    Next.js 15 supports React Server Actions, allowing you to handle server logic directly inside your component files.

    🚀 How it works:

    // Inside your component file
    "use server";
    
    export async function saveForm(data) {
      await db.save(data);
    }

    🧠 Why it matters:

    • No need to create separate api/ endpoints.
    • Full type safety with server logic co-located.
    • Less client-side JavaScript shipped.

    Ideal for: Form submissions, database updates, authenticated mutations.

    2. 🧭 Stable App Router with Layouts and Nested Routing

    Introduced in v13 and now fully stable, the app/ directory in Next.js 15 gives you modular routing with nested layouts, co-located data fetching, and component-based architecture.

    📁 Folder structure:

    app/
    layout.tsx
    page.tsx
    dashboard/
    layout.tsx
    page.tsx

    🎯 Why it matters:

    • Improved scalability for large apps
    • Built-in support for error boundaries and loading states
    • Cleaner structure that mirrors component trees

    Ideal for: Scalable dashboards, admin panels, modular websites.

    3. ⚙️ Partial Prerendering (PPR)

    Static + Dynamic rendering in one page? Yes, please.

    Next.js 15 introduces Partial Prerendering, an experimental feature that allows you to render part of a page statically and the rest dynamically.

    💡 Use case:

    Your homepage might have:

    • A statically rendered hero section
    • A dynamic, user-personalized feed

    🧠 Why it matters:

    • Faster load times for static content
    • Seamless hydration for dynamic sections
    • Enhanced user experience without trade-offs

    4. ⚡️ Turbopack (Improved Performance)

    Turbopack, Vercel’s Rust-based successor to Webpack, continues to mature in Next.js 15. It offers:

    • Blazing-fast cold starts
    • Incremental compilation
    • Near-instant HMR (Hot Module Reloading)

    🧪 How to enable:

    next dev --turbo

    🚀 Why it matters:

    • 10x faster rebuilds compared to Webpack
    • Smooth DX for teams working on large monorepos

    Note: Still experimental but highly promising.

    5. 🖼️ Smarter <Image /> Component

    Image optimization just got smarter. The updated next/image now supports:

    • Native lazy loading
    • Blur-up placeholders
    • AVIF + WebP support out of the box

    🧠 Why it matters:

    • Faster Core Web Vitals (especially LCP)
    • Reduced bandwidth and better UX
    • Simplified image management

    6. 🌐 Edge Middleware Enhancements

    Next.js 15 improves the DX around Edge Middleware, allowing you to run logic at the edge without cold starts or serverless latency.

    📦 Use cases:

    • A/B Testing
    • Geolocation-based redirects
    • Auth checks at the CDN level

    🔥 Improvements:

    • Better logging and error traces
    • Enhanced compatibility with dynamic routes

    7. 🧪 React 19 Compatibility

    Next.js 15 is one of the first frameworks fully compatible with React 19, bringing:

    • React Compiler support (in alpha)
    • Enhanced Concurrent Features
    • Better memory and rendering optimizations

    🧠 Why it matters:

    You can future-proof your app now and explore experimental features with a stable foundation.

    Conclusion

    Next.js 15 isn’t just about new APIs — it’s about enabling fastermore scalable, and more maintainable apps with less effort. These 7 features are engineered to help modern teams:

    ✅ Ship faster
    ✅ Write less code
    ✅ Deliver better performance

    Whether you’re migrating a legacy React app or starting fresh, Next.js 15 equips you with the tools to build next-gen experiences today.

    Ready to Supercharge Your Stack?

    Which feature are you most excited about?
    Leave a comment, share this post with your team, or try upgrading today:

    npm install next@latest

    👉 Follow for more Next.js deep-dives and practical guides.